Email me: jollen # jollen.org

more: Jollen 的 Embedded Linux 教育訓練

« May 2009 | (回到Blog入口) | July 2009 »

June 2009 歸檔

June 3, 2009

Jollen 的 Android 教學,#12: 如何建立選單 Menu

Android應用程式的UI可以使用XML來定義,這個部份在前面的教學裡介紹過。要定義Android應用程式的選單,我們同樣可以使用XML來做描述,請看以下的說明。
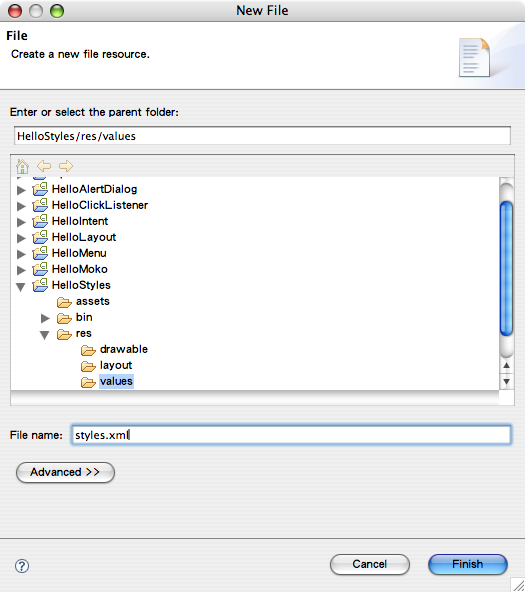
建立 Menu 步驟

1. 建立選單的XML檔

在Android專案的res/目錄下新增一個menu/子目錄,然後建立options_menu.xml文件。

menu-1.png

圖1: 建立menu/目錄

menu-2.png

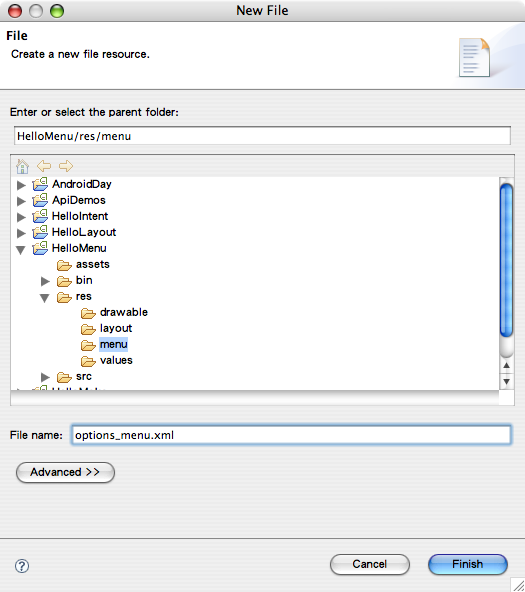
圖2: 建立options_menu.xml文件

2. 以XML定義選單內容

在options_menu.xml檔案裡,定義我們想要的選單內容。以下是一個範例:

<menu xmlns:android="http://schemas.android.com/apk/res/android">
    <item android:id="@+id/new_message"
          android:title="New Message" />
    <item android:id="@+id/quit"
          android:title="Quit" />
</menu>

3. 將選單加入應用程式

要如何在應用程式啟動時加入我們定義好的選單呢?在onCreateOptionsMenu()事件裡以MenuInflater類別將定義好的選單加入應用程式:

public boolean onCreateOptionsMenu(Menu menu) {
    MenuInflater inflater = getMenuInflater();
    inflater.inflate(R.menu.options_menu, menu);
    return true;
}

在這個範例裡,我們使用到二個類別:Menu與MenuInflater,因此記得import這二個套件:

import android.view.Menu;
import android.view.MenuInflater;
執行結果

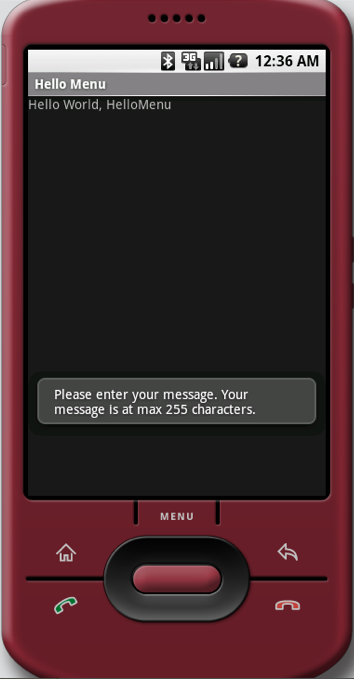
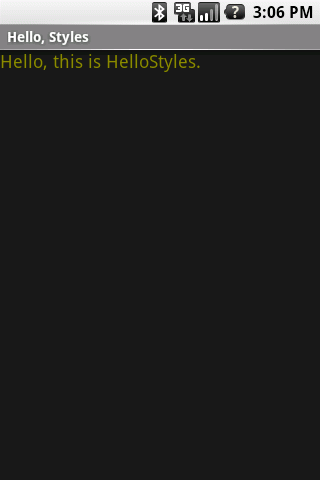
按下手機上的Menu鍵後,出現我們所設計的選單,如圖3。

menu-3.png

圖3: HelloMenu範例的選單畫面

處理選單

最後一個問題是,當使用者觸壓選單上的選項時,Android應用程式要如何處理?方法是透過onOptionsItemSelected()事件:

    public boolean onOptionsItemSelected(MenuItem item) {
    	return true;
    }

當此事件被回呼時,Android框架傳入被觸壓的選項物件,其類別為MenuItem;請import此套件:

import android.view.MenuItem;

前述的教學提到,Android應用程式編譯時,會自動產生R類別,即描述UI的類別。我們所定義的選單UI也會被放到R類別裡,如下:

package com.moko.hellomenu;

public final class R {
    public static final class attr {
    }
    public static final class drawable {
        public static final int icon=0x7f020000;
    }
    public static final class id {
        public static final int new_message=0x7f060000;
        public static final int quit=0x7f060001;
    }
    public static final class layout {
        public static final int main=0x7f030000;
    }
    public static final class menu {
        public static final int options_menu=0x7f050000;
    }
    public static final class string {
        public static final int app_name=0x7f040001;
        public static final int hello=0x7f040000;
    }
}

以下是處理MenuItem的程式範例:

    public boolean onOptionsItemSelected(MenuItem item) {
    	int item_id = item.getItemId();
    	
    	switch (item_id){
    		case R.id.new_message: break;
    		case R.id.quit: break;
    		default: return false;
    	}
    	return true;
    }

呼叫MenuItem的getItemId()方法,可取得該選項的ID,如此一來便能得知使用者所觸壓的選項。

完整程式列表
/* 範例檔名:HelloMenu.java */
package com.moko.hellomenu;

import android.app.Activity;
import android.os.Bundle;
import android.view.Menu;
import android.view.MenuInflater;
import android.view.MenuItem;

public class HelloMenu extends Activity {
    /** Called when the activity is first created. */
    @Override
    public void onCreate(Bundle savedInstanceState) {
        super.onCreate(savedInstanceState);
        setContentView(R.layout.main);
    }
    
    public boolean onCreateOptionsMenu(Menu menu) {
        MenuInflater inflater = getMenuInflater();
        inflater.inflate(R.menu.options_menu, menu);
        return true;
    }
    
    public boolean onOptionsItemSelected(MenuItem item) {
    	int item_id = item.getItemId();
    	
    	switch (item_id){
    		case R.id.new_message: break;
    		case R.id.quit: break;
    		default: return false;
    	}
    	return true;
    }
}

June 4, 2009

Jollen 的 Android 教學,#13: 快顯訊息 android.widget.Toast

Toast是Android提供「快顯訊息」類別,使用時請import以下套件:

import android.widget.Toast;

這是一個很好用的類別,特別是在初步建立Android應用程式的控制或行為時,可以輔助我們進行初步的測試工作。

配合上述的選單範例,我們將onOptionsItemSelected()回呼函數實作修改如下:

    public boolean onOptionsItemSelected(MenuItem item) {
    	int item_id = item.getItemId();
    	
    	switch (item_id){
    		case R.id.new_message: 
                Toast.makeText(
                        this,
                        "Please enter your message."
                                + " Your message is at max 255 characters.",
                        Toast.LENGTH_LONG).show();
    			break;
    		case R.id.quit: 
                Toast.makeText(
                        this,
                        "Going to quit.",
                        Toast.LENGTH_LONG).show();    			
    			break;
    		default: return false;
    	}

此範例以Toast快顯訊息類別來顯示簡短訊息,以驗證上一個選單範例的功能是否正常。

toast-1.png

June 10, 2009

Jollen 的 Android 教學,#14: 什麼是對話盒 (Dialog)?如何建立對話盒?

最少的元件、最舒適的介面

自從有了圖形化應用程式之後,對話盒(dialog)一直是元老級的元件(widget);智慧型手機開始流行後,對話盒仍然是手機介面的重要圖形元件。

在Apple的iPhone問世後,觸控螢幕(touch screen)一直是智慧型手機的標準規格,因此傳統的滑鼠點擊(click)式介面,並不完全適合手指觸控的操作方式,再加上手機觸控螢幕尺吋較小,因此手機應用程式的介面設計,已經與傳統的桌面環境相當不同。

Android的元件庫考量了小尺吋的觸控螢幕,在基本元件的設計上,Android也為使用者做了很體貼的考量。以Android手機應用程式來說,經常使用的元件已經不再像過去的點擊式系統那麼多又複雜;以使用性的角度來看,常被使用的元件如下:

* 選單(Menu)
* 對話盒(Dialog)
* 快顯訊息(Toast)

使用以上三個元件,以及其「變化形」,就能建構一個好用的應用程式介面;再加上Android針對上述的手機操作特性,對其元件庫做了很好的使用設計,因此使用很少的元件,也能提供使用者一個舒適好用的操作介面。

何謂對話盒?

對話盒,故名其思,是一個讓應用程式與使用者「對話」的元件。應用程式透過對話盒與使用者進行下述的對話:

* 詢問問題:使用者回答 Yes/No
* 詢問偏好:使用者選擇自已偏好的項目,可以是單選,也可以是複選
* 說明狀態:讓使用者知道應用程式目前的狀態,例如:顯示「處理中」、「載入中」等訊息

Android提供的對話盒物件為android.app.Dialog,實作上繼承自Dialog的AlertDialog物件是最基本的對話盒物件。使用AlertDialog對話盒,可以詢問使用者問題,也可以詢問使用者偏好。接下來介紹AlertDialog對話盒的設計方法。

建立AlertDialog對話盒

延續「HelloMenu」範例,現在我們想要加入以下的使用情境:

* 使用者按下Menu鍵
* 使用者觸壓 “New Message” 選項
* 出現對話盒、詢問使用者 “Yes/No”

由以上的使用情境來看,應該在onOptionsItemSelected()裡判斷到R.id.new_message項目時,在UI上建立一個對話盒。以下是修改後的onOptionsItemSelected()完整程式碼,完整範例名稱為HelloAlertDialog:

public boolean onOptionsItemSelected(MenuItem item) {
    	int item_id = item.getItemId();
    	
    	switch (item_id){
    		case R.id.new_message: 
	    	        AlertDialog.Builder builder = new AlertDialog.Builder(this);
	    	        
	    	        builder.setMessage("Also post your message to Twitter?");
	    	        builder.setCancelable(false);
	    	        
	    	        builder.setPositiveButton("Yes", new DialogInterface.OnClickListener() {
	    	        	public void onClick(DialogInterface dialog, int id) {
	    	        	}
	    	        });
	    	        
	    	        builder.setNegativeButton("No", new DialogInterface.OnClickListener() {
	    	        	public void onClick(DialogInterface dialog, int id) {
	    	        	}
	    	        });   
	    	        
	    	        AlertDialog alert = builder.create();
	    	        alert.show();
    			break;
    		case R.id.quit: 
                Toast.makeText(
                        this,
                        "Going to quit.",
                        Toast.LENGTH_LONG).show();    			
    			break;
    		default: return false;
    	}
    	return true;
 }

dialog-1.png
圖1: Android的AlertDialog對話盒

產生AlertDialog物件的說明:

1. 產生AlertDialog.builder物件(dialog builder),這是一個用來建立對話盒內容的產生器物件

2. 設定dialog builder的顯示訊息-builder.setMessage()

3. 設定對話盒能不能被「取消」-builder.setCancelable()

4. 利用dialog builder在對話盒裡產生二個按鈕「Yes與No」-builder.setPositiveButton()與builder.setNegativeButton()
使用dialog builder來建立AlertDialog物件,AlertDialog是真正的對話盒物件-builder.create()

5. 將AlertDialog顯示在UI上-alert.show()

產生「Yes按鈕」的程式如下:

builder.setPositiveButton("Yes", new DialogInterface.OnClickListener() {
	public void onClick(DialogInterface dialog, int id) {
		}
});

呼叫builder.setPositiveButton()方法建立一個「正面(Yes)」的按鈕,參數說明如下:

1. 第一個參數:顯示在按鈕上的文字
2. 第二個參數:指定 click listener

每一個按鈕都需要一個click listener,當使用者觸壓按鈕時,click listener便被回呼。android.content.DialogInterface類別提供click listener物件。

June 16, 2009

Linux 2.6.30 釋出

Linux 2.6.30於2009年6月9日釋出,Linux kernel的發展進入了Linux 2.6.3x的時代。最近一年的 Linux 2.6核心發展有相當重大的進展,除了幾個知名大廠不斷貢獻程式碼外,新產品的開發,也帶動Linux kernel的快速發展。

Linux 2.6.30加入了新的filesystem:

1. NILFS2

一種log-structured filesystem,由John K. Ousterhout與Fred Douglis於1988年提出的設計,主要針對high write throughput的應用。

2. POHMELFS (Parallel Optimized Host Message Exchange Layered File System)

一個分散式平行處理的檔案系統,在讀寫操作方面,根據[POHMELFS]官方的數據指出,POHMELFS的效能比NFS還好。

3. DST(Distributed STorage)

一個具高效能與可信賴的網路儲存檔案系統。

4. EXOFS(Object-Based Storage Devices)

支援OSD protocol的檔案系統。

5. FS-Cache

這是一個網路檔案系統(networking filesystem)的cache layer,FS-Cache可以將網路檔案系統的資料 cache 在磁碟裡。

其他更新

另外,Intel也貢獻了fastboot(快速開機)程式碼,過去kernel在開機時花費許多時間在處理 I/O 上,例如:儲存裝置的I/O,由Intel貢獻的fastboot以asynchronous function call的觀念解決此問題。其原理在kernel/async.c裡的註解有很清楚的說明:

14 /*
15
16 Goals and Theory of Operation
17
18 The primary goal of this feature is to reduce the kernel boot time,
19 by doing various independent hardware delays and discovery operations
20 decoupled and not strictly serialized.
21
22 More specifically, the asynchronous function call concept allows
23 certain operations (primarily during system boot) to happen
24 asynchronously, out of order, while these operations still
25 have their externally visible parts happen sequentially and in-order.
26 (not unlike how out-of-order CPUs retire their instructions in order)
27
28 Key to the asynchronous function call implementation is the concept of
29 a "sequence cookie" (which, although it has an abstracted type, can be
30 thought of as a monotonically incrementing number).
31
32 The async core will assign each scheduled event such a sequence cookie and
33 pass this to the called functions.
34
35 The asynchronously called function should before doing a globally visible
36 operation, such as registering device numbers, call the
37 async_synchronize_cookie() function and pass in its own cookie. The
38 async_synchronize_cookie() function will make sure that all asynchronous
39 operations that were scheduled prior to the operation corresponding with the
40 cookie have completed.
41
42 Subsystem/driver initialization code that scheduled asynchronous probe
43 functions, but which shares global resources with other drivers/subsystems
44 that do not use the asynchronous call feature, need to do a full
45 synchronization with the async_synchronize_full() function, before returning
46 from their init function. This is to maintain strict ordering between the
47 asynchronous and synchronous parts of the kernel.
48
49 */

關於 fastboot 的做法,在LWN上的一篇文章[An asynchronous function call infrastructure]有很不錯的介紹。

Red Hat也貢獻了二個新的system call:preadv()與pwritev()。其他更多Linux 2.6.30的變更,可參考[kernelnewbies]上的說明。

June 17, 2009

Garmin-Asus的nuvifone G60改用Android作業系統

CNET ASIA上的一則報導[Android to replace Garmin-Asus' current Linux platform]指出,Garmin-Asus的nuvifone G60將改採Android作業系統

nuvifone-g60.jpg
(圖片來源:CNET)

2009年二月,Garmin與Asus正式宣佈策略聯盟,並以「Garmin-Asus」雙品牌策略進行行銷。nuvifone G60是Garmin-Asus雙品牌行銷策略下的第一個產物,nuvifone G60則是以導航功能為主軸的手機。

根據報導指出,Garmin-Asus現有的Linux平臺將只使用在G60裝置上,未來的裝置會採用Windows Mobile或者是Android作業系統。

如同Garmin的PND產品都是採用Linux作業系統一樣,原本nuvifone G60也計畫採用Linux作業系統,不久前,在engadget上的報導也出現實機照片;但是,隨著CNET這則報導的出現,整個開發計畫是否有了改變,頗令人好奇。

Android原本就對Google Map有很好的支援,再加上nuvifone G60是以導航以及地圖應用為主的手機,若是改採Android作業系統,也是一個合理的做法。

* Update: 2009/6/19

June 18, 2009

Jollen 的 Android 教學,#15: 什麼是事件監聽器(Event Listener)?

學會產生基本的UI後,接著就要學習UI的事件處理(UI Events),才能讓UI與使用者「互動」。

什麼是事件監聽器(Event Listener)

UI的使用者事件處理,即View如何處理使用者的操作,是一個重要的課題。View是重要的類別,它是與使用者互動的前線;在Android框架的設計中,以事件監聽器(event listener)的方式來處理UI的使用者事件。

Android框架提供了非常良好的UI事件處理機制。先前的教學提到,View是繪製UI的類別,每個View物件都可以向Android框架註冊一個事件監聽器。每個事件監聽器都包含一個回呼函數(callback method),

這個回呼函數(callback method)主要的工作就是回應或處理使用者的操作。

Event Listener: 以Click Listener為例

以「使用者觸碰(touch)」的動作來說,當View要處理使用者觸碰的事件時,就要向Android框架註冊View.OnClickListener事件監聽器;當「touch」事件發生時,Android框架便回呼事件監聽器裡的回呼函數。

View.OnClickListener是click listener,故名思意,這是UI的「Click動作監聽器」;當使用者對View進行Click操作時(即觸控畫面上的UI元件),Android框架便會回呼這個View.OnClickListener的回呼函數。

View.OnClickListerner的回呼函數為OnClick()。

這裡所提到的監聽器泛指event listener,主要用來「監聽」使用者的各種動作。除了View.OnClickListener外,Android框架還有以下的event listener(及其callback method):

  • View.OnLongClickListener: onLongClick()
  • View.OnFocusChangeListener: onFocusChange()
  • View.OnKeyListener: onKey()
  • View.OnTouchListener: onTouch()
  • View.OnCreateContextMenuListener: onCreateContextMenu()

另外一種處理UI事件的機制為事件處理器(event handler),event handler與event listener是不一樣的二種處理機制。在自訂Android component的教學裡,再介紹這個部份。

Jollen 的 Android 教學,#16: Event Listener的用法: 以Click Listener為例

Event Listener的用法: 以Click Listener為例

以Android所提供的View.OnClickListener來說明程式實作方法。一個較為良好的實作方法是在我們的Acitivty類別裡實作View.OnClickListener介面,即:

import android.view.View;
  
public class HelloClickListener extends Activity implements View.OnClickListener {
   ...
}

每一個View都可以註冊一個event listener,當Android框架收到「click」事件後,便回呼event listener的callback method。以Button類別(按鈕元件)為例,當我們想要處理使用者觸控按鈕的事件時,就要呼叫Button類別的setOnClickListener()方法來註冊click listener。上述的實作方方法是,直接在我們的Activity類別HelloClickListener裡實作View.OnClickListener,因此上述Button類別的click listener為「this」。

上述的實作觀念,可用圖1來表示。

HelloClickListener.png
圖1: HelloClickListener類別實作View.OnClickListener介面

註冊click listener的程式碼如下:

   public void onCreate(Bundle savedInstanceState) {
        super.onCreate(savedInstanceState);
        setContentView(R.layout.main);
        
        Button button = (Button)findViewById(R.id.btn);
        button.setOnClickListener(this);
    }

在onCreate()裡先找到Button元件,它的click listener為this為,接著在我們的Activity類別裡實作onClick()。onClick()方法的程式碼如下,我們以Toast類別來回應訊息給使用者:

   public void onClick(View v) {
        Toast.makeText(
                this,
                "Yes.",
                Toast.LENGTH_LONG).show();  
    }

完整程式碼: HelloClickListener.java

package com.moko.helloclicklistener;
   
import android.app.Activity;
import android.os.Bundle;
import android.widget.Button;
import android.widget.Toast;
import android.view.View;
   
public class HelloClickListener extends Activity implements View.OnClickListener {
    /** Called when the activity is first created. */
    @Override
    public void onCreate(Bundle savedInstanceState) {
        super.onCreate(savedInstanceState);
        setContentView(R.layout.main);
        
        Button button = (Button)findViewById(R.id.btn);
        button.setOnClickListener(this);
    }
    
    public void onClick(View v) {
        Toast.makeText(
                this,
                "Yes.",
                Toast.LENGTH_LONG).show();  
    }
}

執行結果

clicklistener-1.png
圖2: HelloClickListener的執行結果

當使用者觸碰畫面上的按鈕時,便以Toast類別在畫面上顯示「Yes」。

June 20, 2009

Jollen 的 Android 教學,#17: 樣式設計(Styles)初體驗

在這篇教學裡,我們將用一個非常簡單的範例來初步體驗Android的「styles」功能。

什麼是樣式(Styles)?

Android的樣式設計(style)是一個很重要的功能,因為它可以讓應用程式裡的元件(widget)「長」得跟別人很不一樣。樣式設計的使用規定如下:

  • 在Android專案裡以XML資源檔來定義「樣式」
  • 一個Android專案可以定義多個樣式
  • 讓widget套用其中一個樣式

Android的styles功能,主要的對象是widget,樣式是為了套用到widget上;另外Android還提供佈景(theme)功能,可以做更大範圍的套用。

如何定義樣式

定義樣式的方式如下:

1. 在Android專案的「res/values」資料夾裡建立styles.xml樣式定義檔。如圖1。

styles-1.png
圖1: 建立styles.xml

2.在styles.xml裡定義樣式,以下是一個範例:

<?xml version="1.0" encoding="utf-8"?>
<resources>
    <style name="myText">
        <item name="android:textSize">18sp</item>
        <item name="android:textColor">#880</item>
    </style>
</resources>

styles.xml的寫法說明如下:

1. 在 <resource>標籤裡定義資源項目, <style>標籤用來定義樣式資源
2. <style>的name屬性定義此樣式的名字,widget使用此名字以套用樣式
3. <item>標籤定義此樣式的內容
4. <item>的name屬性為android:textSize時,表示定義此樣式的字體大小,在此設定字體大小為18sp
5. <item>的name屬性為android:textColor時,表示定義此樣式的字體顏色,在此設定字體顏色為#880(RGB)
6. 更多的樣式屬性,請參考Android Reference

定義好樣式後,就可以讓widget套用樣式。

Widget如何套用樣式

如何讓widget套用上述定義的「myText」樣式,方法很簡單。還記得UI layout檔main.xml嗎?只要在widget的項目裡,加上style屬性,並指定樣式名稱即可。以下是HelloStyles範例:

<?xml version="1.0" encoding="utf-8"?>
 <LinearLayout xmlns:android="http://schemas.android.com/apk/res/android"
    android:orientation="vertical"
    android:layout_width="fill_parent"
    android:layout_height="fill_parent"
    >
 <TextView  
    android:layout_width="fill_parent" 
    android:layout_height="wrap_content" 
    android:text="Hello, this is HelloStyles."
    style="@style/myText"
    />
 </LinearLayout>

「@style/myText」表示要指定一個style的名稱,此名稱為myText。

執行結果:

styles-2.png
圖2: HelloStyles的執行畫面

June 21, 2009

Jollen 的 Android 教學,#18: 佈景(Theme)初體驗

上一節提到佈景(theme)是可以大範圍套用的UI美化功能,其套用範圍為「整個螢幕」,從程式碼的角度來看,佈景可以套用到以下二個範圍:

  • 整個應用程式(application)
  • 整個activity

接下來,我們以一個很簡單的例子,來說明如何套用佈景到application。在一些應用,我們可能不想要顯示視窗標題(title),怎麼做出這個功能呢?利用佈景設定的方式即可達成。以下是實作方法。

在styles.xml裡加入以下內容:

<?xml version="1.0" encoding="utf-8"?>
<resources>
    <style name="myTheme">
    	<item name="android:windowNoTitle">true        
    </style> 
</resources>

修改AndroidManifest.xml,在標籤裡加上「theme」屬性:

<?xml version="1.0" encoding="utf-8"?>
<manifest xmlns:android="http://schemas.android.com/apk/res/android"
      package="com.moko.hellotheme"
      android:versionCode="1"
      android:versionName="1.0.0">
    <application android:icon="@drawable/icon" android:label="@string/app_name"
    	android:theme="@style/myTheme">
        <activity android:name=".HelloTheme"
                  android:label="@string/app_name">
            <intent-filter>
                <action android:name="android.intent.action.MAIN" />
                <category android:name="android.intent.category.LAUNCHER" />
            </intent-filter>
        </activity>
    </application>
</manifest>

執行結果:

theme-1.png
圖1: HelloTheme的執行結果

在這個範例裡,我們並沒有修改任何的程式碼,其原理是透過佈景設定的方法。定義佈景的方式與定義樣式(styles)相同,同樣是在styles.xml裡以<item>標籤來定義。

以下是使用HelloTheme的說明:

1. <item>的name屬性為android:windowNoTitle時,表示定義是否要顯示視窗標題,在此設定為true,表示不要有視窗標題
2. 在<application>標籤裡加上theme屬性,將佈景套用到應用程式

佈景除了能套用到應用程式外,也能套用到activity。如何套用佈景到activity呢?只要在<activity>裡加入theme屬性即可,做法與<application>相同。

關於 June 2009

此頁面包含了在June 2009發表於Jollen's Blog的所有日記,它們從老到新列出。

前一個存檔 May 2009

後一個存檔 July 2009

更多信息可在 主索引 頁和 歸檔 頁看到。

Top | 授權條款 | Jollen's Forum: Blog 評論、討論與搜尋
Copyright(c) 2006 www.jollen.org